
When Mr Kishor Rathi, director of Aurangabad-based Spinform Plastics, approached me to try out his Rotary Drum Composter some months ago, I was more keen on reviewing his large-scale composting products. But Mr Rathi persisted and couriered this compact, twin-coloured unit. The company manufactures various types of composters of different capacities for both home and community purposes. Here, I have reviewed only the Rotary Twin Drum composter and added a few details on the Single Drum composter with wheel.
Infrastructure


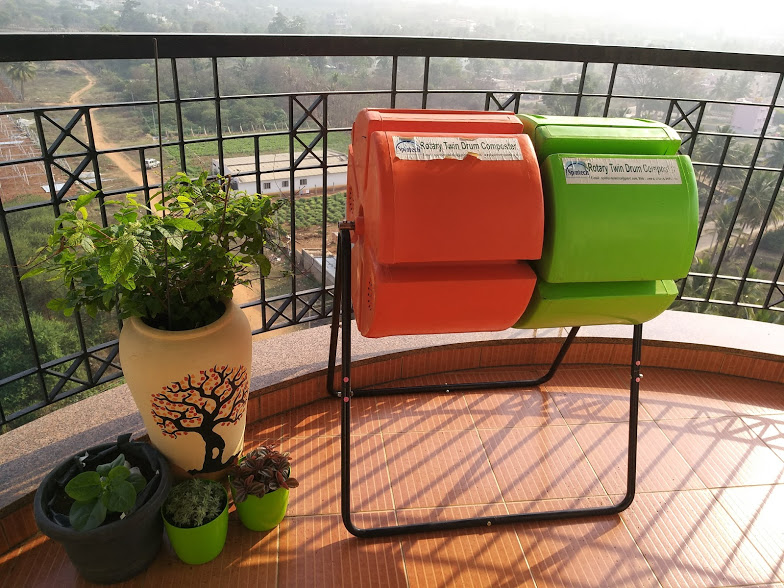
Sturdy is the word. The drums are made out of high-quality UV-stabilised, linear low-density polyethylene. The drums are anything but light and the thickness of their skin serves two purposes: Structural stability and heat retention capacity. The middle layer is fortified with polyethylene foaming insulation. Says Kishor: “Foaming gives structural stability to the drum as well as retains the heat produced during composting which once again speeds up the process.”
Each drum is of 60 litres capacity and comes in bright orange, light green and blue shades. The colour choice is simply for aesthetics purposes and not aimed at colour coding. The design of the drum is interesting. Each drum has five deep-grooved moulded fins. These depressions help you spin the drum groove by groove to ensure proper tumbling of the pile inside.
For each drum, there’s a sliding lid. I found the lids hard to open initially when the unit was brand new. But it got better in a few weeks. Although Mr Rathi immediately responded to the complaint and sent two new lids with a much smoother surface, I switched back to the old ones as the new ones were allowing more spillage when rotated.
These two drums sit tight on a heavy-duty, powder-coated tubular stand. The central axis made out of stainless steel tube is rust-proof and strong enough take the load of two fully loaded drums.
The kit

- Rotary Twin Drum Compost Tumbler Kit, all packed in corrugated carton, includes:
1. Two Rotary Drums along with a stainless steel 304 pipe axle and powder-coated MS stand.
2. 2 bags of compost and two pouches of bioculture (white powder) which acts as an accelerator.
3. Manuals and brochures.
4. Two empty PP sacs for collecting and storing dry leaves and unloading finished compost.
5. Spanners.
6. Hand gloves
Space required
The diameter of the 60-litre drum is 21 inches. The base of the composter needs 2ft ![]() x 2.5ft (L) of space, approximately.
x 2.5ft (L) of space, approximately.
 Twin Drum composter
Length: 32 inch
Width: 23 inch
Height: 39 inch
Single drum with wheel
Length: 23.5 inch
Width: 19.5 inch
Height: 33.5 inch
Assembly
The drums are heavy. You will need help to assemble them. The brochure supplied by the vendor has necessary instructions.
The process
I was keen on experimenting this composter without using any kind of accelerator other than the compost sent by the vendor and my own home-produced compost which was, please note, made using microbial accelerators. The idea is to go vendor-independent and once installed, I wanted to know if this system can become a self-sustaining unit. I must say that I am quite satisfied with its performance.
As Mr Rathi advised, I put only raw fruit peels and discarded vegetable cuttings and no cooked food leftovers whatsoever to prevent odours. This was just a precaution I took as no accelerator was added. Accelerators are nothing but concentrated microbial solutions that come both in powder or liquid forms. When you sprinkle/spray them on your organic rejects, they invade the surface area of the raw material and decomposition begins instantly. When you aerate the container well and add a balanced green and brown content, odour issues do not crop up. But because I went ahead without accelerators, I added only raw rejects to help the microbes colonise the container first. It does take time and for the same reason, the first batch of composting usually takes a little longer than the subsequent ones.
The slideshow shows decomposition in progress.
Most often, I cut the fruits peels into smaller ones and crushed the brown dry leaves to speed up the process. The drum size is quite sufficient for a small three- to four-member family. It took me a few weeks to fill one drum. And since degradation keeps happening, you will see the pile turning black in just about 15 days. But I kept adding more rejects until it was 80% full and saved some airspace to let the tumbling happen properly when rotated.
I started adding cooked leftovers after one week. Since there was enough moisture in the rejects added, I didn’t have to worry about the moisture levels. The temperature started building up quickly but I could feel the heat hitting my skin only after it had 35-40% of rejects in it.
I did notice some fruit-flies hovering over the composter placed in my living balcony where there is a bit of direct sunlight but less wind. I shifted it to another balcony where both natural elements are available aplenty. The flies disappeared in no time.
Rotation technique
Slide open the lids and add the rejects to the drum. Shut the lid and rotate it a few times. Instead of giving it one full turn, try rotating it groove by groove so that the pile tumbles nicely and all the ingredients inside get mixed thoroughly. One of the plus points of this composter is the equal distribution of moisture content, thanks to its rotating mechanism.
Do not fill it to the brim as it needs airgaps for proper tumbling of the pile when rotated. Always leave 20-30% space free and move on to the second one. If you cut the rejects into smaller pieces, the drum can take in more.
We all know rotation does speed up the composting process as the bacteria love collision to multiply. But the same doesn’t work for fungi which get sliced and diced heavily if you turn the pile too many times. A well-balanced compost means a balanced ratio of bacteria and fungi and other micro-organisms. I rotated the drum 7-8 times right after tipping in the rejects. Once in a while, I turned it a few times in the evening. But once should be enough to aerate the mass.
A month later, I started getting a nice smell from the drum but still kept feeding. Once it was 80% full, I moved on to the second drum and rotated both drums every day.
That sweet smell…!
It took almost nine weeks for me to come up with my first batch. If you add accelerator as suggested by the vendor, 3-4 weeks are enough. The compost was cool to touch (which is an important factor to be noted before you harvest). I spread a plastic sheet under the composter, dislodged the lid and let the pile pour out with the mouth facing the ground. The grains were even, the colour perfect black and the smell, heavenly! I did find quite a few lumps though. When crushed, some of them had a few semi-composted dry leaves. I threw them back into the drum to accelerate the next batch. Maybe, if you spin the composter more, the lumps may disappear. But that was hardly my concern.
Odour issues
As discussed earlier, each depression in the drum on the outer side has two holes for aeration. There are two more depressions each with a lot more holes. In all, four aeration vents. These are sufficient to let fresh air in and drive out anaerobic microbes, if any. I did not face any odour issues. Not just lack of air, bad odour can also be caused by lack of brown component like crushed dry leaves, dried grass, saw dust, etc. Make sure you feed the drum a balanced raw material.
According to Kishor, the most common issues his customers face is odour and maggots. “That’s because they put too much of kitchen waste and do not add sufficient brown content. We have helped them fix the problem by adding enough dry leaves.”
Rodents
The stand lifts the drums 1.5 feet above the ground and thus, keeps them rodent-free. The aeration vent has small holes which can allow passage only for small ants and no other larger creatures.
Rains
Although it is better to avoid direct rainwater splashing, I didn’t face any moisture issues with the recent heavy rains in Bangalore. Since the aeration vent has small holes, you will probably not face the problem of rainwater entering the drum in quantities that can harm the process. To be on the safer side, avoid exposing it to incessant rains.
Durability
If you place it under the hot sun, the composter will last a minimum of 10 years. The colours may fade after four to five years.
Kishor adds: “However, we do not recommend exposure to continuous sunlight especially during summer as the temperature inside the drum may rise beyond 70 deg.C. Such high heat slows down microbial activity. It’s a closed container and retains heat generated by microbial activity quite effectively because of the insulation. If placed in shade, it will easily last 15 years.”
No or any accelerator
As amply demonstrated, this composter can work only on some old compost to accelerate the process. But if you are keen, you may use any kind of accelerator you prefer. It will work just fine.
Advantages
It helps you feed and harvest continuously. When one fills up, another takes over. But this also depends on the quantity of the waste generated. Put simply, it works a treat for even a large family. If one litre is equal to approximately one kilo, then each family generating one kg of kitchen waste can go on feeding one drum for 70-80 days. Speed up the process by chopping the rejects into smaller pieces and then adding accelerator only if you are keen. Keep adding brown leaves, grass cuttings, saw dust or cocopeat often to bring out a compost that has a balanced carbon-nitrogen ratio. In the case of single drum composter, you have portability as its main feature as is shown in the picture.
The kit is quite sturdy, durable and a one-time outgo for a long time. No accelerator means no operational expenditure.
The colours
When I put up a post using the pictures of this composter on Facebook, people seemed to be quite attracted to its colours. “Presently, we are making the drums only in three colours (bright orange, light green and blue). But we can make it in any colour,” chimes in Kishor.
The cost
Rotary Twin Drum composter:
Basic price: Rs 6,000.
Delivery charges: Rs 700.
GST, 12 % : Rs 800.
Total: Rs 7,500.
Single drum composter
Basic price: Rs 4,200.
Delivery charge: Rs 700.
GST, 12%: Rs 600.
Total: Rs 5,500.
Contact details:
Kishor B Rathi, Director & CEO, Spinform Plastics Pvt Ltd, Plot # B 37/2, Midc Chikalthana, Aurangabad-431006. Email: spinformplastics@gmail.com, Cell : 91 94227 06700, Landline: 0240 2486476.


As always, very well explained. I am tempted to get this beauty though i have been using greentech buckets for quite some time.
LikeLiked by 1 person
Thanks for reading and commenting, Kulraj! 🙂
LikeLike
Nice article. Lucid, crisp.
LikeLiked by 1 person
Thanks. 🙂
LikeLike
Hi Savita,
Great to read such a detailed description of two drum rotating composter. What are the main advantages when compared to say khamba?
LikeLiked by 1 person
Hi Meera, each has its own merits and demerits. But what I like about the twin drum is you can compost and harvest continuously, less space needed to process a lot of wet rejects. It’s durable and sturdy. Hope it helps.
LikeLike
Sounds brilliant! Would this work for senior citizens? My mother wants to compost but the bokashi bin did not work for her. Khamba will be too heavy to lift.
LikeLiked by 1 person
Hi Somya, rotation is easy. Doesn’t require much effort. But for senior citizens, feed the drum only up to 60-65% and then move on to the next. It won’t be heavy. Hope it helps.
LikeLiked by 2 people
Thanks Savitha! It is expensive as compared to Khamba/Bokashi so needed to ask before committing to it.
LikeLiked by 2 people
SH, if someday you get tired of this composter or find a better method, you know who you can give this composter away to!
LikeLiked by 1 person
Sure. But you need to first let me know your whereabouts., 🙂
LikeLike
Ok, messaged you on your 360 gmail address.
LikeLiked by 1 person
Hello, please clarify my doubt as to whether matured compost itself can be used as a replacement for browns in any compost bin?
LikeLiked by 1 person
Dear Mr Vaidyanathan,
Matured compost can be used for accelerating the process of the new/upcoming pile. As to whether it can be used as a substitute for browns depends on how much carbon content (browns) went into that particular batch in terms of dry leaves, cocopeat and the like. If there was sufficient brown content in it, then you can take a chance. Else, to be safe, it’s better to keep adding crushed dry leaves to avoid uncontrolled maggot formation. Hope it helps. To your another question on Jeevamrutha, give me a few more days. The expert I consult is busy in a workshop. Thank you for reading my blog. Good day. 🙂
LikeLike
Thanks a million for your reply. Shall eagerly wait for the reply to my query on jeevamruth. Thanks again. Enjoy a fabulous day. Cheers.
LikeLiked by 1 person
Forgive me for bothering you with yet another doubt of mine. Can the rotating composter highlighted here, handle meat, fish and similar wastes? The write up does not mention that.
Thanks in advance.
Vaidyanathan.
LikeLiked by 1 person
Yes, it does. To ensure the process goes on at a good speed, chop all kinds of rejects into smaller pieces.
LikeLike
Thanks again.
Enjoy an awesome day. Cheers.
LikeLiked by 1 person
And, you too!
LikeLike
Hello.
I want to order this product, but it has very little drainage holes. Will it be possible for you to drill holes in the plastic. Does it come with a tray to catch the leachate, what do you suggest to manage the leachate
LikeLiked by 1 person
If you add enough dry leaves or coco peat, you will probably not see leachate dripping down. There is no need to drill more holes. Please call up the vendor to discuss more. Thank you.
LikeLike
Please advise about suggested proportion of dry leaves or coco peat to kitchen waste, by volume / weight.
Will sawdust be a suitable alternative to dry leaves or coco peat ?
Please confirm that the kitchen waste needs to be drained of liquid before introducing to the compost bin, thereafter moisture control by dry leaves / coco peat / saw dust.
Thank you and to all participants.
LikeLiked by 1 person
Dear Dilip,
This is what I have done and it has worked:
1. Waste: microbial cocopeat = 1: 3, by weight.
2. If you add a bucket of waste, then add two buckets of dry leaves. If you can crush them, that would be better.
Draining of liquid content: If you can do that, that would be ideal especially during rainy/winter days. But pouring liquid content like sambar/rasam, etc., should be avoided at any cost.
Hope it helps.
– Savita
LikeLike
Dear Ms. Hiremath,
Thanks for your kind reply.
Will sawdust be a suitable alternative to dry leaves or coco peat ?
LikeLiked by 1 person
Oh, sorry. Forgot to answer that part.
I would not recommend sawdust as it tends to have high electrical conductivity. Microbial cocopeat is better. But if you have no other option, you can use it. Just that it sticks to the waste surface and the entire pile gets sticky. Aeration becomes a problem. You will have to aerate the mass well to avoid odour issues.
Good luck.
LikeLike
Not only the Product but the details and way of explaining about the product, instructions everything just amazing. Visiting the page for first time and really felt great. Planning to go for this one. How can i purchase the product? !!!
LikeLiked by 1 person
Hi, please write to endlesslygreen360@gmail.com with relevant contact details. Thank you for visiting my blog and commenting. 🙂
LikeLike
how has this worked over a longer period of time, looking to the last post being in 2019
LikeLiked by 1 person
I am still using the same composter, Gunjan.
LikeLike
thanks for sharing. I have recently started with the compost unit and had a question. my tea is made with ginger. is it ok to add tea along with ginger to my compost unit? I have read other articles where authors suggested to avoid orange, onions peels. wanted to check for ginger with you.
LikeLiked by 1 person
Hi, You can add *everything* that comes out of your kitchen. Better to avoid coconut shell only because it takes very long to decompose. Also avoid liquid-y sambar-like stuff. NO need to take out orange, onion peels, etc. Just make sure you add sufficient brown dry leaves or cocopeat as carbon content. When you get the carbon and nitrogen (your kitchen waste) ratio right, then acidic levels come to neutral as the process comes to an end. No need to worry about acidity levels.
LikeLiked by 1 person
Thanks for quick answer. it was helpful. one more q. the spintech drums come with 2 compost packets, 2 microbes packet. I have started with 2 compost packets, used 2-3 tableshpoon of microbes from one packet. then adding green waste + dry leaves daily. Should whole of microbes (2 packets) be added in the initial compost (start)?
LikeLike
Just a spoon for one batch will do.
LikeLiked by 1 person
No need to add the microbes each time. Just a couple of spoons for the entire batch is enough. After that, microbial colonies build up on their own. You just keep it going all the time. Good luck.
LikeLike
Hi its order of 4-5 weeks i have added green/dry leaves in the drum and rotating it. recently – i see that banana very small (smaller than ant) kind of inspects in the item like peas cover, banana head (to which a bunch of banana remain attached) in the drum. are they expected. i can share picture as well. kindly help to troubleshoot this. this is my first compost experiment.
LikeLike
Your comment is not clear. Could not understand. Please revise it and comment again. Thanks.
LikeLike